Redis笔记02

Redis笔记01

线程模型

单线程模型,文件事件处理器通过IO多路复用 监听多个socket(socket执行accept read write close等操作产生文件事件),然后由文件事件处理器处理文件事件。

持久化方式

rdb:快照

1
2
3
save 900 1
save 300 10
save 60 10000

aof: 默认配置的是 appendonly no,改成yes打开AOF模式

如何连接Redis

1~使用实现了一致性哈希算法的proxy中间件twemproxy
2~Java使用Jedis、ShardedJedis、JedisPool、JedisSentinelPool(哨兵模式)或JedisCluster(Redis cluster模式)连接redis

Jedis 2.9.1存在的一个bug: https://blog.csdn.net/u013527895/article/details/103121558

Jedis加载redis集群的第一个节点如果异常不在线,并且redis设置了密码的话,会因连接异常退出不再尝试下一个节点。所谓第一个节点,就是所有redis节点加载到HashSet集合后集合里第一个元素。

1
2
3
4
5
6
7
8
9
10
11
12
13
14
15
16
17
18
19
20
21
22
23
//src/main/java/redis/clients/jedis/JedisClusterConnectionHandler.java
private void initializeSlotsCache(Set<HostAndPort> startNodes, GenericObjectPoolConfig poolConfig, int connectionTimeout, int soTimeout, String password, String clientName) {
for (HostAndPort hostAndPort : startNodes) {
Jedis jedis = null;
try {
jedis = new Jedis(hostAndPort.getHost(), hostAndPort.getPort(), connectionTimeout, soTimeout);
if (password != null) {
jedis.auth(password);
}
if (clientName != null) {
jedis.clientSetname(clientName);
}
cache.discoverClusterNodesAndSlots(jedis);
break;
} catch (JedisConnectionException e) {
// try next nodes
} finally {
if (jedis != null) {
jedis.close();
}
}
}
}

Jedis连接Redis代码参考

深入剖析Redis客户端Jedis的特性和原理: https://baijiahao.baidu.com/s?id=1715292157796722813&wfr=spider&for=pc

主从模式连接:Jedis

1
2
3
4
5
6
7
8
9
10
11
12
13
14
15
16
17
18
import redis.clients.jedis.Jedis;

public class MasterAndSlaveTest {
public static void main(String[] args) throws InterruptedException {
Jedis jedis_M = new Jedis("192.168.248.129",6379); //主机
Jedis jedis_S = new Jedis("192.168.248.129",6380); //从机

//遵循“配从不配主”的模式
jedis_S.slaveof("192.168.248.129",6379);

jedis_M.set("class", "8888"); //主机去写

//内存中读写太快,防止读在写之前先完成而出现null的情况,这里做一下延迟
Thread.sleep(2000);
String result = jedis_S.get("class"); //从机去读
System.out.println(result);
}
}

多个redis实例(非cluster):ShardedJedis,一致性哈希算法

1
2
3
4
5
6
7
8
9
10
11
12
13
14
15
import java.util.ArrayList;
import java.util.List;
import redis.clients.jedis.JedisShardInfo;
import redis.clients.jedis.ShardedJedis;

List<JedisShardInfo> shards = new ArrayList<>();
JedisShardInfo info = null ;
for (String address : addresss.split(",")) {
String[] hostAndPort = address.split(":");
info = new JedisShardInfo(hostAndPort[0], Integer.valueOf(hostAndPort[1]));
shards.add(info);
}
shardedJedis = new ShardedJedis(shards);
shardedJedis.set("a", "123");
shardedJedis.get("a");

哨兵模式连接:JedisSentinelPool

1
2
3
4
5
6
7
8
9
10
11
12
13
14
15
16
17
18
19
20
21
22
23
24
25
26
27
28
29
import redis.clients.jedis.JedisPoolConfig;
import redis.clients.jedis.JedisSentinelPool

//1.设置sentinel 各个节点集合
Set<String> sentinelSet = new HashSet<>();
sentinelSet.add("192.168.14.101:26379");
sentinelSet.add("192.168.14.102:26379");
sentinelSet.add("192.168.14.103:26379");

//2.设置jedispool 连接池配置文件
JedisPoolConfig config = new JedisPoolConfig();
config.setMaxTotal(10);
config.setMaxWaitMillis(1000);

//3.设置mastername,sentinelNode集合,配置文件,Redis登录密码
JedisSentinelPool jedisSentinelPool = new JedisSentinelPool("mymaster",sentinelSet,config,"123");
Jedis jedis = null;
try {
jedis = jedisSentinelPool.getResource();
//获取Redis中key=hello的值
String value = jedis.get("hello");
System.out.println(value);
} catch (Exception e) {
e.printStackTrace();
} finally {
if(jedis != null){
jedis.close();
}
}

cluster模式连接:JedisCluster,哈希槽算法

1
2
3
4
5
6
7
8
9
10
11
12
13
14
15
16
17
18
19
20
21
22
23
24
25
26
27
import java.util.HashSet;
import java.util.Set;
import redis.clients.jedis.HostAndPort;
import redis.clients.jedis.JedisCluster;

public class TestJedisCluster {
public static void main(String[] args) {
//1、创建jedidsCluster客户端
//创建一个set集合,用来封装所有redis节点的信息
Set<HostAndPort> nodes = new HashSet<>();

nodes.add(new HostAndPort("192.168.23.12", 7001));
nodes.add(new HostAndPort("192.168.23.12", 7002));
nodes.add(new HostAndPort("192.168.23.12", 7003));
//...

JedisCluster cluster = new JedisCluster(nodes);

String name = cluster.get("user:id:1:name");
cluster.set("user:id:1:address", "你好呀");
String address = cluster.get("user:id:1:address");

System.out.println("name:"+name);
System.out.println("address:"+address);
if(null!=cluster){
cluster.close();
}}}

集群操作

5.0版本之前使用redis-trib.rb ruby脚本操作redis集群,5.0以上统一使用redis-cli操作。

redis cluster半数以下的节点陆续下线后,集群仍可正常提供服务,节点重新上线后,节点上原master变成slave,后面不发生异常的话,不会自动调转过来。

创建redis-cluster

哨兵模式可参考:https://github.com/AliyunContainerService

多容器创建redis cluster:

Dockerfile:

1
2
3
4
5
6
7
8
9
10
11
12
13
14
15
16
FROM redis

RUN ln -sf /usr/share/zoneinfo/Asia/Shanghai /etc/localtime
RUN echo 'Asia/Shanghai' >/etc/timezone

EXPOSE $REDIS_PORT
# EXPOSE $REDIS_PORT_NODE

COPY entrypoint.sh /usr/local/bin/
COPY redis.conf /usr/local/etc/

RUN chmod 777 /usr/local/etc/redis.conf
RUN chmod +x /usr/local/bin/entrypoint.sh

ENTRYPOINT ["/usr/local/bin/entrypoint.sh"]
CMD ["redis-server", "/usr/local/etc/redis.conf"]

redis.conf:

1
2
3
4
5
6
7
8
9
10
11
12
13
#端口
port REDIS_PORT
#开启集群
cluster-enabled yes
#配置文件
cluster-config-file nodes.conf
cluster-node-timeout 5000
#更新操作后进行日志记录
appendonly yes
#设置主服务的连接密码
# masterauth
#设置从服务的连接密码
# requirepass

docker-compose.yml:

1
2
3
4
5
6
7
8
9
10
11
12
13
14
15
redis1:
image: redis-cluster
restart: always
volumes:
- /data/redis-cluster/6381/data:/data
environment:
- REDIS_PORT=6381
ports:
- '6381:6381'
- '16381:16381'

# 其余5个依次可定6382
...
redis6:
...

这里,其实可以让6个容器都保持默认6379端口,但宿主机端口不能重复。

cluster.sh:

1
2
3
4
5
6
7
8
9
10
11
12
13
#!/bin/sh

para=""
port=6380
for i in `seq 1 6`
do
ipaddr=$(docker inspect redis-cluster_redis${i}_1 |jq '.[0].NetworkSettings.Networks.bridge.IPAddress' |sed 's/\"//g')
let port=port+1
echo $ipaddr:$port
para="$para $ipaddr:$port"
done

docker run --rm -it inem0o/redis-trib create --replicas 1 $para

entrypoint.sh:

1
2
3
4
5
6
7
8
9
10
11
12
#!/bin/sh

set -e

# allow the container to be started with `--user`
if [ "$1" = 'redis-server' -a "$(id -u)" = '0' ]; then
sed -i 's/REDIS_PORT/'$REDIS_PORT'/g' /usr/local/etc/redis.conf
chown -R redis .
exec gosu redis "$0" "$@" #gosu是sudo轻量级”替代品”
fi

exec "$@"

构建、启动:

1
2
3
4
5
6
7
8
9
10
11
12
13
14
15
16
17
18
19
20
21
22
23
24
25
26
27
28
29
30
31
32
33
34
35
36
37
38
39
40
41
42
43
44
45
46
47
48
49
50
51
52
53
54
55
56
57
58
59
60
61
62
63
64
65
66
67
68
69
70
71
[root@localhost redis-cluster]# docker build -t redis-cluster .  
[root@localhost redis-cluster]# docker-compose up -d
[root@localhost redis-cluster]# docker-compose ps
Name Command State Ports
----------------------------------------------------------------------------------------------------------------------------
redis-cluster_redis1_1 /usr/local/bin/entrypoint. ... Up 0.0.0.0:16381->16381/tcp, 6379/tcp, 0.0.0.0:6381->6381/tcp
redis-cluster_redis2_1 /usr/local/bin/entrypoint. ... Up 0.0.0.0:16382->16382/tcp, 6379/tcp, 0.0.0.0:6382->6382/tcp
redis-cluster_redis3_1 /usr/local/bin/entrypoint. ... Up 0.0.0.0:16383->16383/tcp, 6379/tcp, 0.0.0.0:6383->6383/tcp
redis-cluster_redis4_1 /usr/local/bin/entrypoint. ... Up 0.0.0.0:16384->16384/tcp, 6379/tcp, 0.0.0.0:6384->6384/tcp
redis-cluster_redis5_1 /usr/local/bin/entrypoint. ... Up 0.0.0.0:16385->16385/tcp, 6379/tcp, 0.0.0.0:6385->6385/tcp
redis-cluster_redis6_1 /usr/local/bin/entrypoint. ... Up 0.0.0.0:16386->16386/tcp, 6379/tcp, 0.0.0.0:6386->6386/tcp
[root@localhost redis-cluster]#
[root@localhost redis-cluster]# sh cluster.sh
172.17.0.2:6381
172.17.0.7:6382
172.17.0.4:6383
172.17.0.5:6384
172.17.0.3:6385
172.17.0.6:6386
172.17.0.2:6381 172.17.0.7:6382 172.17.0.4:6383 172.17.0.5:6384 172.17.0.3:6385 172.17.0.6:6386
WARNING: IPv4 forwarding is disabled. Networking will not work.
>>> Creating cluster
>>> Performing hash slots allocation on 6 nodes...
Using 3 masters:
172.17.0.2:6381
172.17.0.7:6382
172.17.0.4:6383
Adding replica 172.17.0.5:6384 to 172.17.0.2:6381
Adding replica 172.17.0.3:6385 to 172.17.0.7:6382
Adding replica 172.17.0.6:6386 to 172.17.0.4:6383
M: 0229502412d452827895d48428924ebfdef281c5 172.17.0.2:6381
slots:0-5460 (5461 slots) master
M: 6e8a42258f6d8cdf77611f959665853a81e3bb87 172.17.0.7:6382
slots:5461-10922 (5462 slots) master
M: af21e289c4e1426777626fb5f07c26fcb02cf795 172.17.0.4:6383
slots:10923-16383 (5461 slots) master
S: 89335368454ba872d4d3ba814b3bbec116e993c6 172.17.0.5:6384
replicates 0229502412d452827895d48428924ebfdef281c5
S: d1d295a8ece6ffa037ea1b721d036b91a6eef08c 172.17.0.3:6385
replicates 6e8a42258f6d8cdf77611f959665853a81e3bb87
S: 6b26027dd63542d9b509ff7b0c9ba163891611a6 172.17.0.6:6386
replicates af21e289c4e1426777626fb5f07c26fcb02cf795
Can I set the above configuration? (type 'yes' to accept): yes
>>> Nodes configuration updated
>>> Assign a different config epoch to each node
>>> Sending CLUSTER MEET messages to join the cluster
Waiting for the cluster to join.
>>> Performing Cluster Check (using node 172.17.0.2:6381)
M: 0229502412d452827895d48428924ebfdef281c5 172.17.0.2:6381
slots:0-5460 (5461 slots) master
1 additional replica(s)
S: 6b26027dd63542d9b509ff7b0c9ba163891611a6 172.17.0.6:6386@16386
slots: (0 slots) slave
replicates af21e289c4e1426777626fb5f07c26fcb02cf795
S: 89335368454ba872d4d3ba814b3bbec116e993c6 172.17.0.5:6384@16384
slots: (0 slots) slave
replicates 0229502412d452827895d48428924ebfdef281c5
S: d1d295a8ece6ffa037ea1b721d036b91a6eef08c 172.17.0.3:6385@16385
slots: (0 slots) slave
replicates 6e8a42258f6d8cdf77611f959665853a81e3bb87
M: af21e289c4e1426777626fb5f07c26fcb02cf795 172.17.0.4:6383@16383
slots:10923-16383 (5461 slots) master
1 additional replica(s)
M: 6e8a42258f6d8cdf77611f959665853a81e3bb87 172.17.0.7:6382@16382
slots:5461-10922 (5462 slots) master
1 additional replica(s)
[OK] All nodes agree about slots configuration.
>>> Check for open slots...
>>> Check slots coverage...
[OK] All 16384 slots covered.
[root@localhost redis-cluster]#

连接redis1:

1
2
3
4
5
6
7
8
9
10
11
12
13
14
15
16
17
18
19
20
21
22
23
24
25
[root@localhost redis-cluster]# docker run --rm -it redis redis-cli -h 172.17.0.2 -p 6381
172.17.0.2:6381> info replication
# Replication
role:master
connected_slaves:1
slave0:ip=172.17.0.5,port=6384,state=online,offset=322,lag=0
master_failover_state:no-failover
master_replid:7c24732ceeb781c3b3274395d92081c79f13364f
master_replid2:0000000000000000000000000000000000000000
master_repl_offset:322
second_repl_offset:-1
repl_backlog_active:1
repl_backlog_size:1048576
repl_backlog_first_byte_offset:1
repl_backlog_histlen:322
172.17.0.2:6381>
172.17.0.2:6381>
172.17.0.2:6381> cluster nodes
6b26027dd63542d9b509ff7b0c9ba163891611a6 172.17.0.6:6386@16386 slave af21e289c4e1426777626fb5f07c26fcb02cf795 0 1636057597000 3 connected
89335368454ba872d4d3ba814b3bbec116e993c6 172.17.0.5:6384@16384 slave 0229502412d452827895d48428924ebfdef281c5 0 1636057597299 1 connected
0229502412d452827895d48428924ebfdef281c5 172.17.0.2:6381@16381 myself,master - 0 1636057597000 1 connected 0-5460
d1d295a8ece6ffa037ea1b721d036b91a6eef08c 172.17.0.3:6385@16385 slave 6e8a42258f6d8cdf77611f959665853a81e3bb87 0 1636057598319 2 connected
af21e289c4e1426777626fb5f07c26fcb02cf795 172.17.0.4:6383@16383 master - 0 1636057597000 3 connected 10923-16383
6e8a42258f6d8cdf77611f959665853a81e3bb87 172.17.0.7:6382@16382 master - 0 1636057598726 2 connected 5461-10922
172.17.0.2:6381>

image-20211105043729294

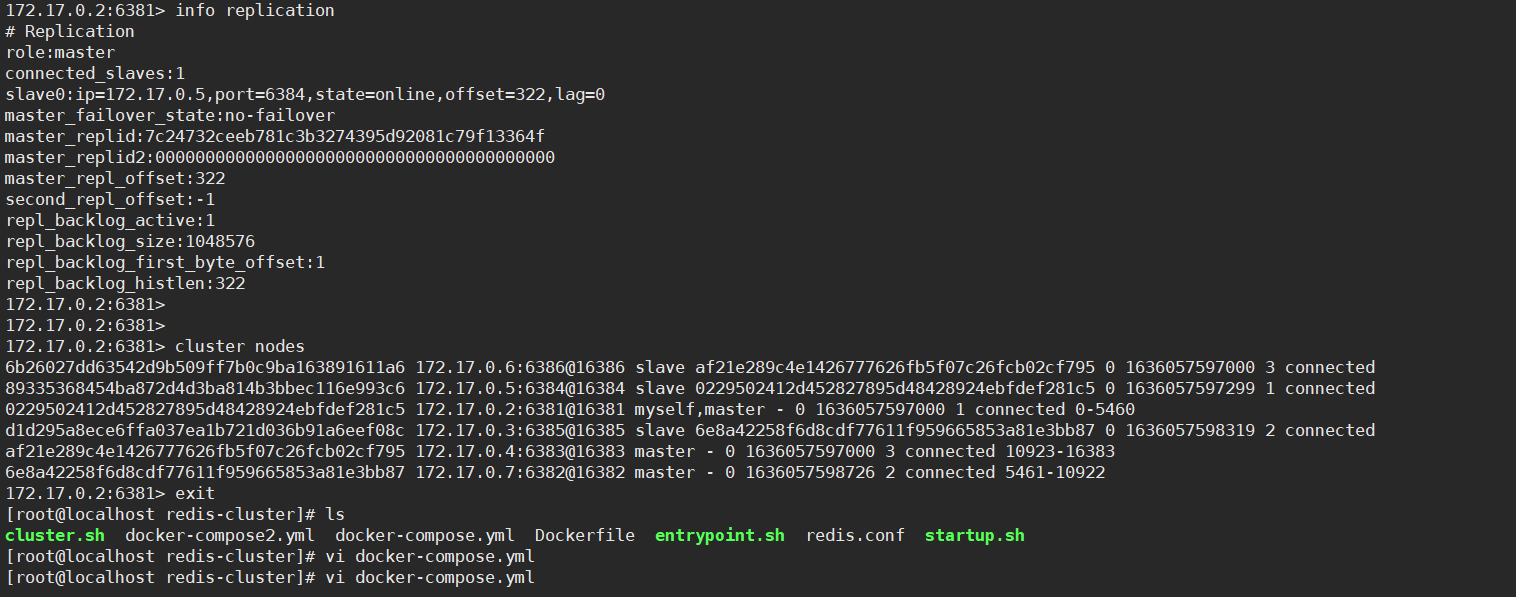
stop/restart redis1:

1
2
[root@localhost redis-cluster]# docker-compose stop redis1
Stopping redis-cluster_redis1_1 ... done

image-20211105043827581

master fail一个,对应的slave 172.17.0.5:6384变成新的master了。

重新上线redis1:172.17.0.5:6384,它是新master的slave了。

image-20211105044630762


(待续)

0%